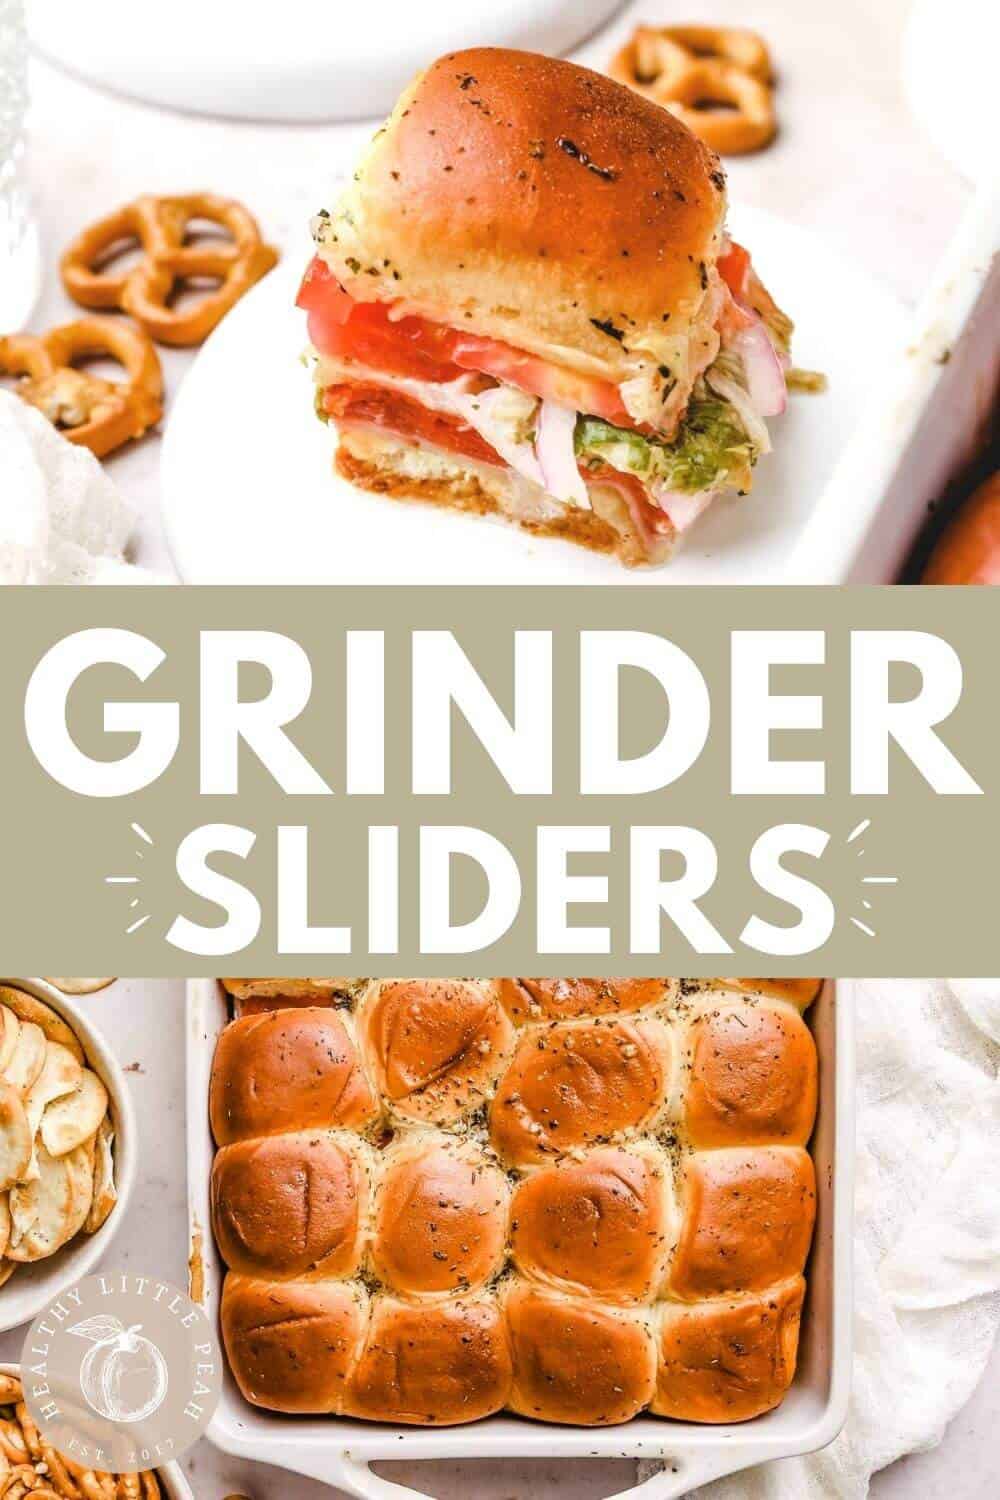
Grinder Sandwich Sliders
Published Aug 08, 2022 Updated Jul 11, 2023
This post may contain affiliate links. Please read our disclosure policy.
What Makes This Recipe Great
The Italian Grinder Sandwich is all the rage these days, and there is good reason for it! This famous sandwich is packed with delicious meats, provolone cheese, fresh veggies, and a delicious creamy dressing.
Since I love feeding a crowd, especially during this fun summer season full of gatherings and BBQs, I decided to make grinder sandwich sliders, the perfect shareable sandwich so everyone can get in on the trend!
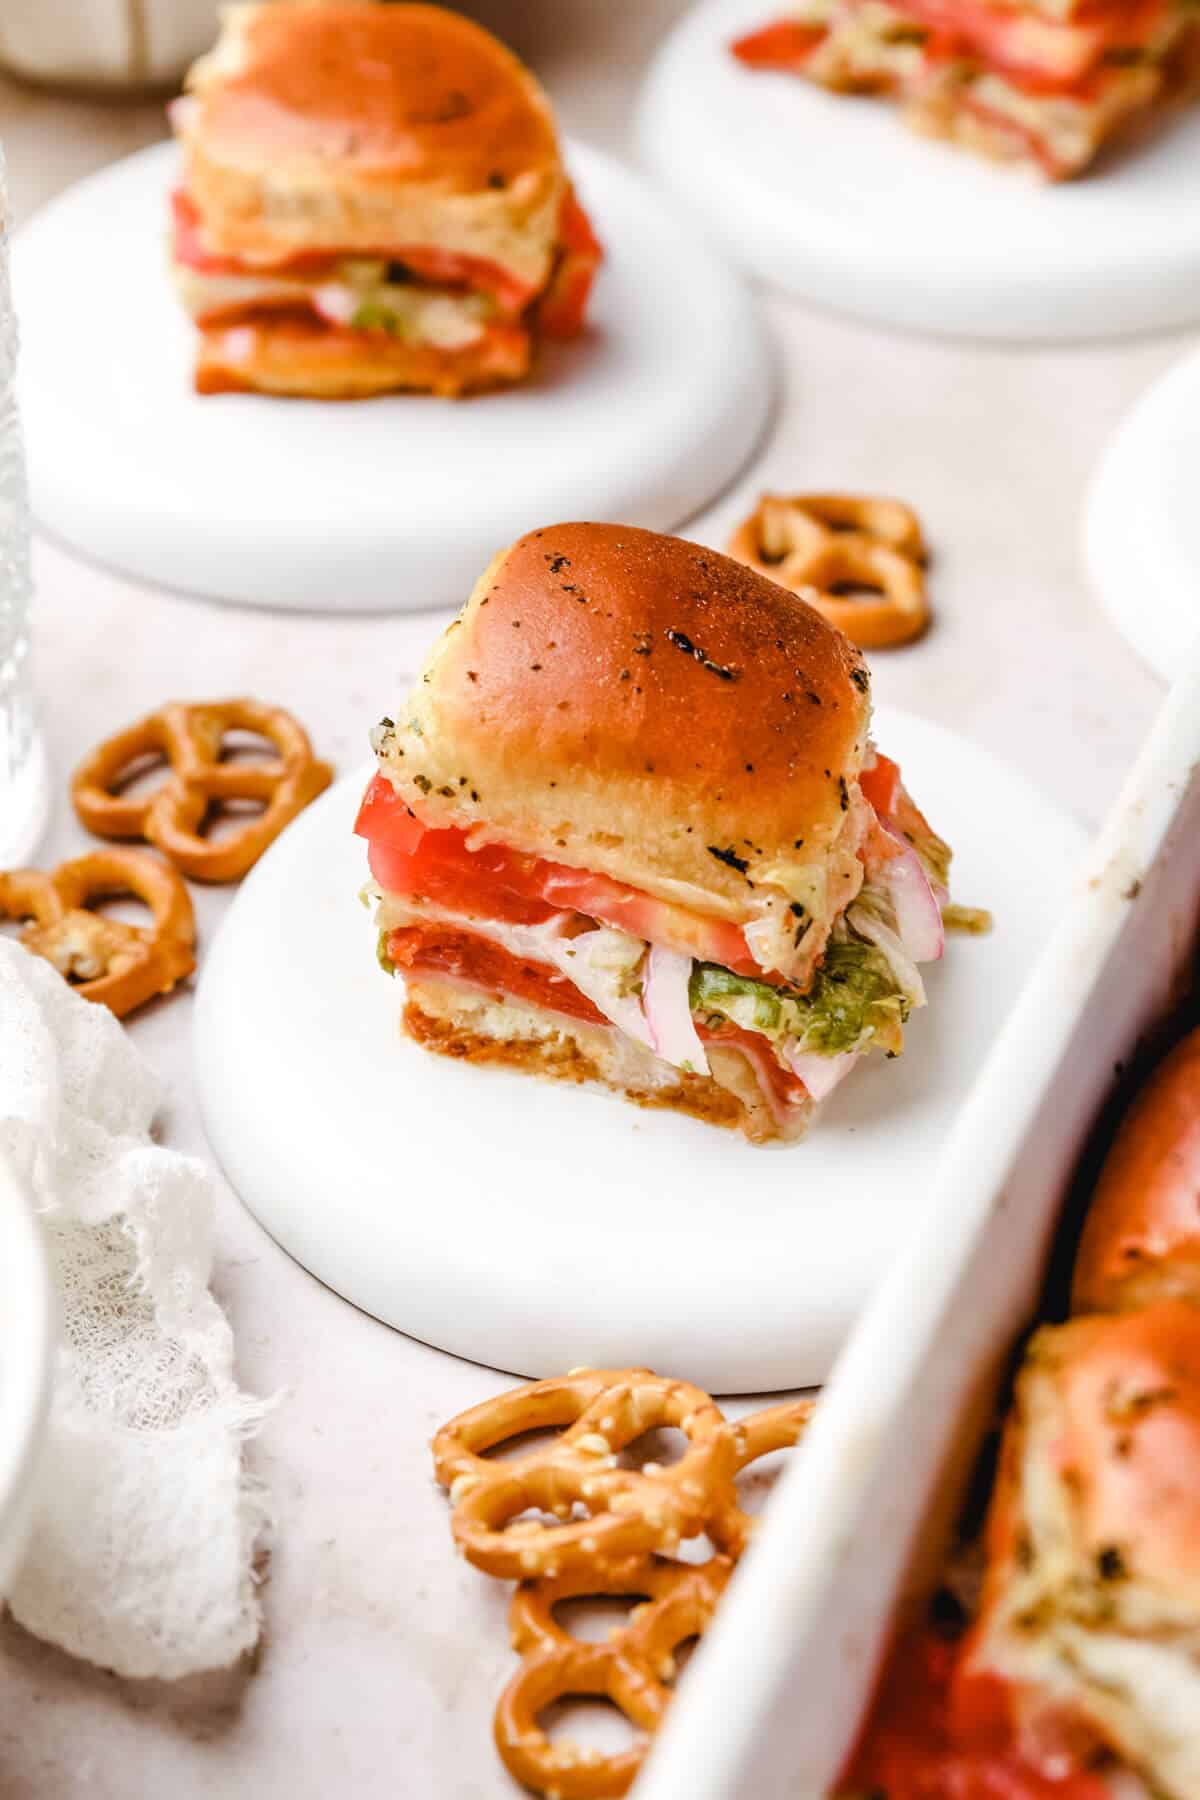
These mini sliders are made with Hawaiian rolls, garlic butter, and all the fillings of the standard Italian grinder. You’ll want to make a double batch because they are that good!
Recipe Highlights
- Easy, 20-Minute Recipe!
- Perfect Appetizer, Lunch, or Entree!
- Yields 24 Sliders- Enough to feed a crowd!
Ingredient Notes
Grinder Sandwich Sliders
*See recipe card for full list of ingredients*
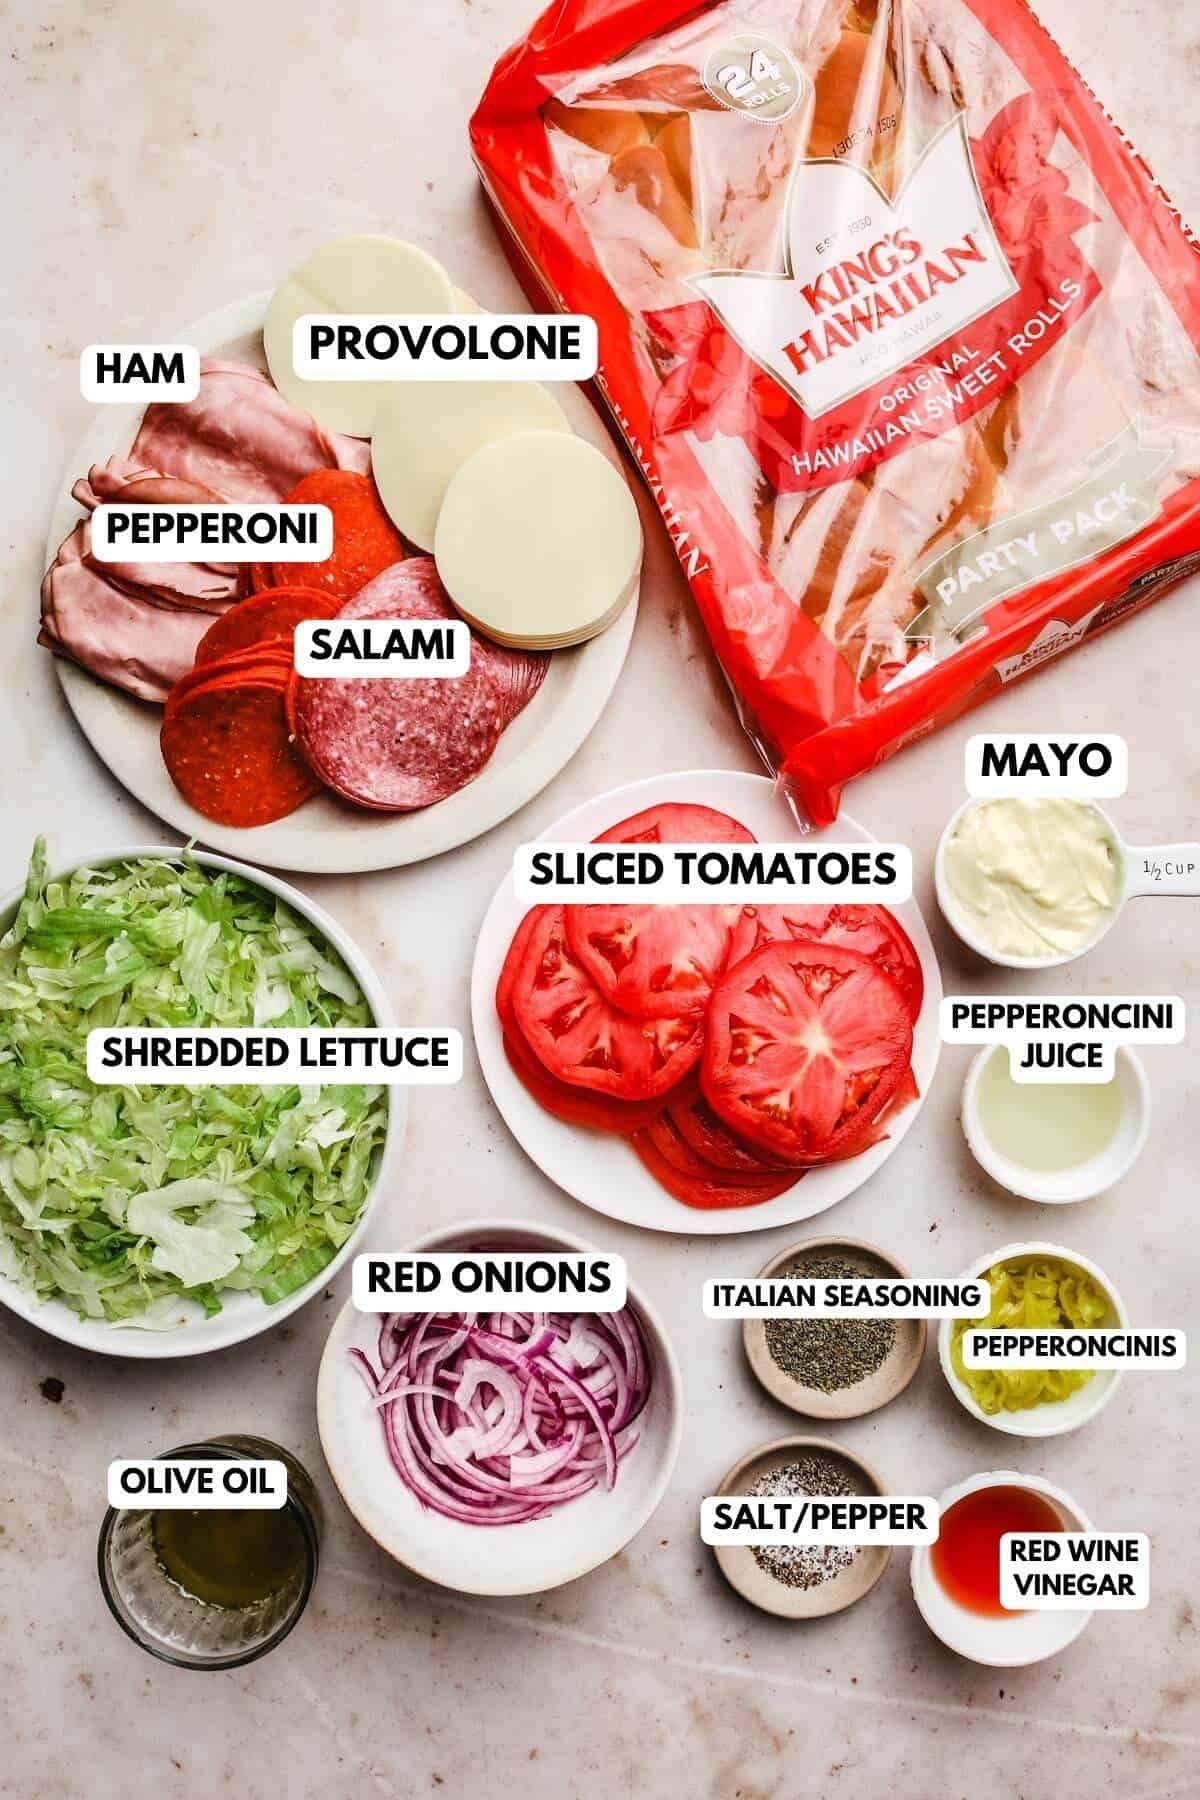
Bread: For this recipe, I used Hawaiian Rolls which crisp up so nicely but still have the perfect pillowy bread texture.
Meat: For these sliders, I used pepperoni, salami, and ham, but if you have something else on hand, use that! Prosciutto is another option that would work great!
Cheese: Italian sandwiches go so well with provolone cheese, which is what I used, but you can swap it for your favorite- it’ll still be great!
Grinder Salad/Dressing
Mayo: Use your favorite brand or make my homemade 60-second mayo!
Dressing: red wine vinegar, olive oil, pepperoncini juice (use this straight from the jar of pepperoncinis).
Veggies: The grinder salad aspect of this recipe calls for shredded lettuce, sliced tomatoes, red onion, and pepperoncini- so delicious!
Spices: Italian seasoning, salt, pepper.
Garlic Butter
To make the garlic butter you’ll just need three ingredients: melted butter, minced garlic cloves, and Italian seasoning. You can omit this step if you’d like, but it adds tons of amazing flavor!
Recipe Step by Step
- Preheat the oven to 350F.
- In a medium bowl add the mayo, olive oil, red wine vinegar, lettuce, pepperoncini’s and juice, Italian seasoning, salt, pepper, and onion slices. Mix together until combined.
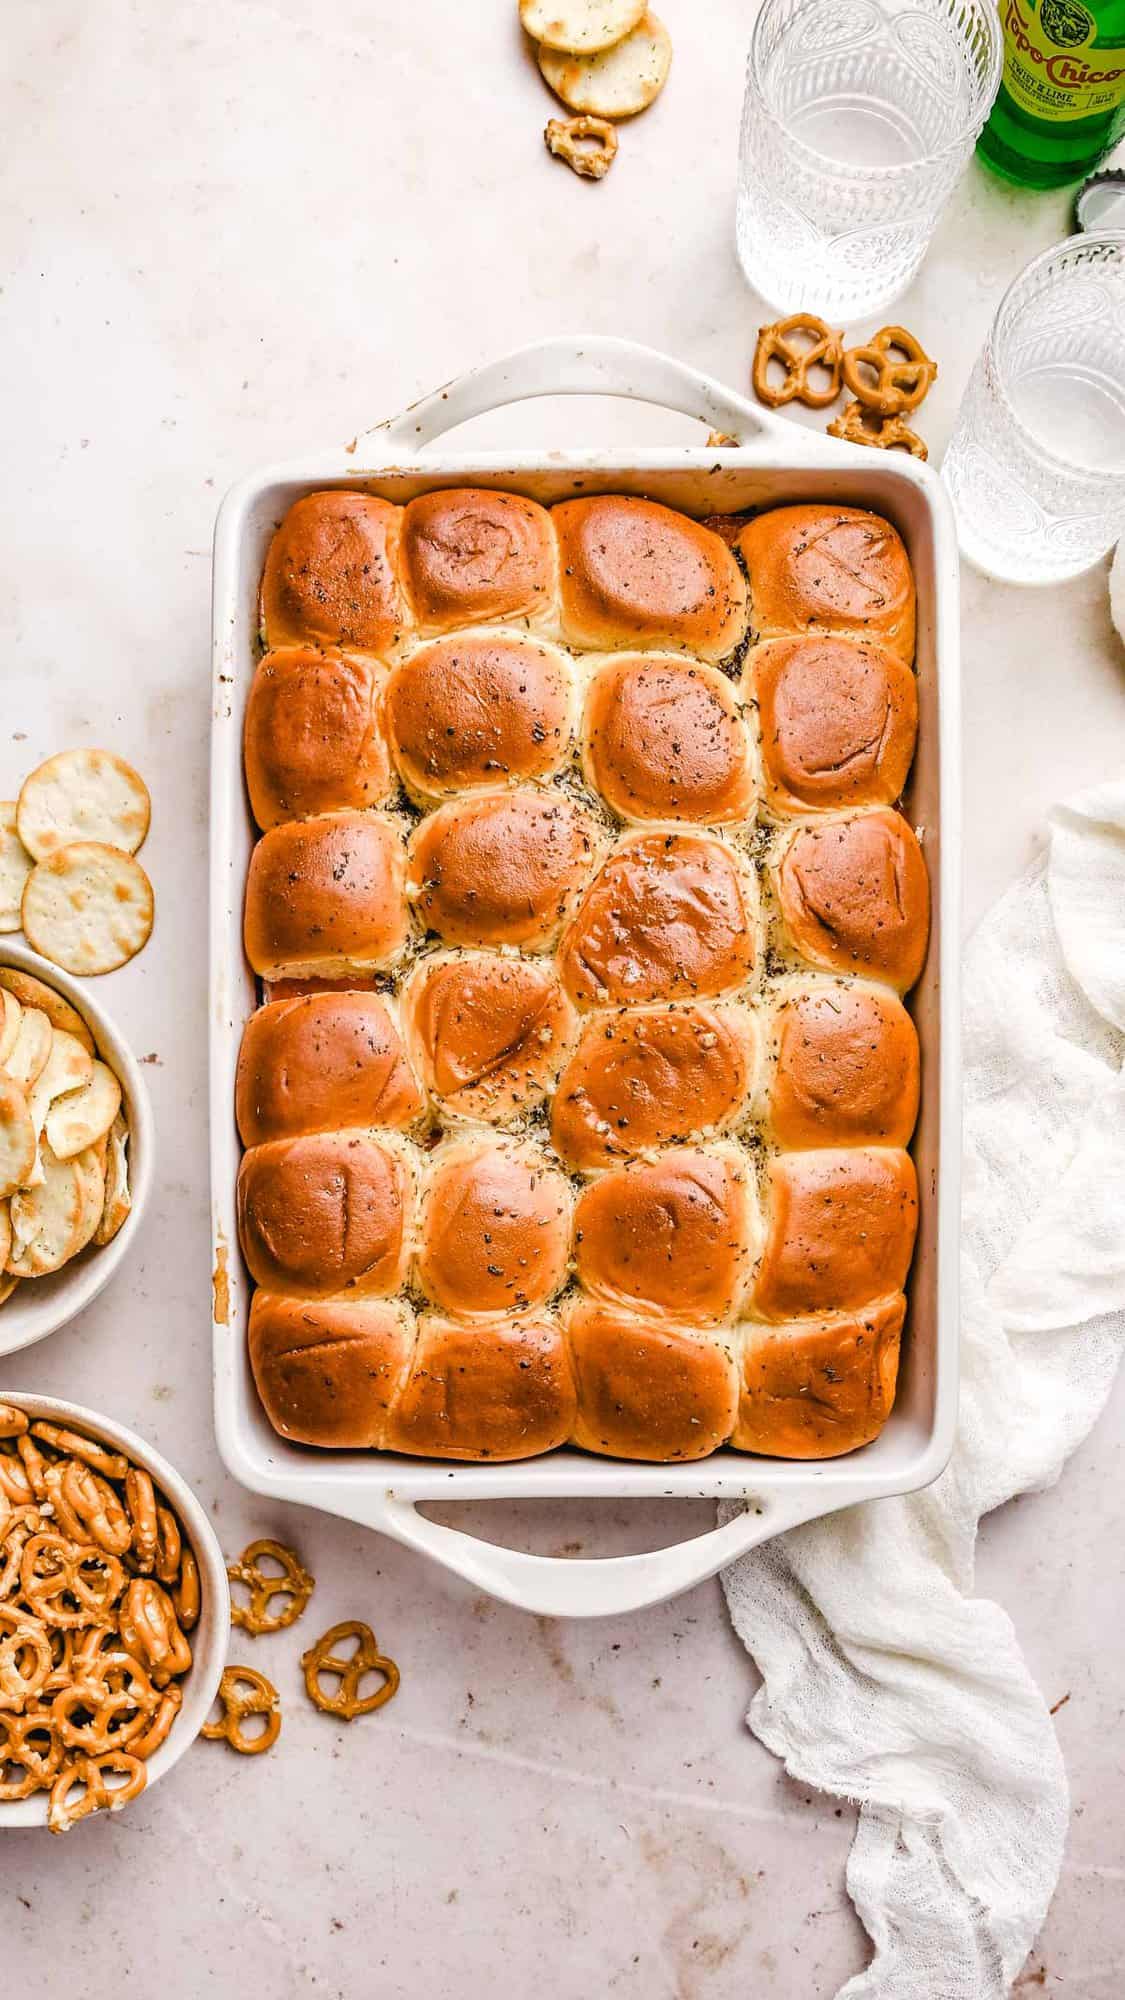
- Cut the rolls in half and lay down the provolone cheese slices, ham slices followed by salami slices, and then pepperoni slices. Add the bread on top.
- In a small bowl, combine the melted butter and garlic and 1 teaspoon of Italian seasoning. Brush the top of the bread rolls with the butter mixture
- Cover with foil and bake for 12 minutes. Remove the foil and bake another 10-12 minutes or until the top is brown.
- Remove the top layer of bread and add the salad mixture after the sandwiches have cooked.
- Serve and enjoy!
Mac’s Pro Tips
How to Serve: Serve warm with your favorite sides and enjoy! If you’re planning to bring these as an appetizer, or have a larger crowd, double the recipe to make enough for everyone!
Storage: These are a bit tricky to store because half of the ingredients are cold and half is hot. If you do want to save them, I recommend storing them in an airtight container in the refrigerator and eating the leftovers cold.
Sides: The options are endless! Some of my favorite sides: No Egg Potato Salad, Crispy Air Fryer Sweet Potato Fries, or your favorite bag of potato chips! You really can’t go wrong.

Recipe FAQs
There’s much debate as to exactly why this grinder sandwich is called a grinder, but two things are for sure: it originated on the East Coast, and it contains hot ingredients (whereas a sub contains cold ingredients!).
Actually, yes! If you eliminate the bread from the recipe and fill a bowl with the salad, dressing, veggies, meat, and cheese, you have yourself a keto-friendly Italian grinder sandwich bowl!
More Crowd-Favorite Recipes


Grinder Sandwich Sliders
Ingredients
Sliders
- 1 24- pack Hawaiian Rolls
- 12-14 slices pepperonis
- 12-14 sliced tomatoes
- 12-14 slices salami
- 12-14 slices of ham
- 12-14 slices of provolone
Salad/Dressing
- 1 14 oz bag shredded lettuce
- 1/2 cup mayo
- 1 tablespoon red wine vinegar
- 1 tablespoon olive oil
- 1/2 red onion sliced
- 1/3 cup pepperoncinis
- 1 tablespoon pepperoncini juice
- 2 teaspoons Italian seasoning
- 1/2 teaspoon salt
- 1/4 teaspoon pepper
Garlic Butter
- 2 1/2 tablespoons melted butter
- 2 garlic cloves minced
- 1/2 teaspoon Italian Seasoning
Instructions
- Preheat oven to 350F.
- In a medium bowl add the mayo, olive oil, red wine vinegar, lettuce, pepperoncini's and juice, Italian seasoning, salt, pepper, and onion slices. Mix together until combined.
- Cut the rolls in half and lay down the provolone cheese slices, ham slices followed by salami slices, and then pepperoni slices. Add the bread on top.
- In a small bowl, combine the melted butter and garlic and 1 teaspoon of Italian seasoning. Brush the top of the bread rolls with the butter mixture
- Cover with foil and bake for 12 minutes. Remove the foil and bake another 10-12 minutes or until the top is brown.
- Remove the top layer of bread and add the tomatoes and salad mixture after the sandwiches have cooked.
- Serve and enjoy!
Notes
Nutrition information is automatically calculated, so should only be used as an approximation.


So good! Messy to eat, but good haha. The sauce mixture is the main attraction! Thanks for a great recipe!
So happy you loved it.
Absolutely love this easy recipe! It’s on repeat more than once a week at my house right now! Thank you, Mac, for another amazing recipe!⭐️⭐️⭐️⭐️⭐️💖
Super good. Will definitely make it again!
So happy to hear this. Thank you
Made these for a wedding shower, exactly as recipe stated. They were SOOO good!
A great twist from the typical slider sandwiches!
Loved them! Thanks for great recipes🌞🥰
Thanks Kathy! So glad you enjoyed them.
Sandwich was phenomenal! I am from Montreal Quebec and tastes exactly like a Dagwood sandwich!! Amazing! Hubby loved it
These are delicious and so easy to make! My family asks for them every year for the 4th of July and everyone loves them!
Your comment just made me smile. Thank you for sharing!