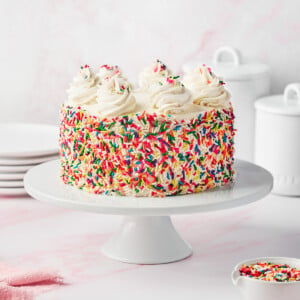
Gluten-Free Funfetti Birthday Cake
Published Apr 18, 2024 Updated Feb 04, 2026
This post may contain affiliate links. Please read our disclosure policy.
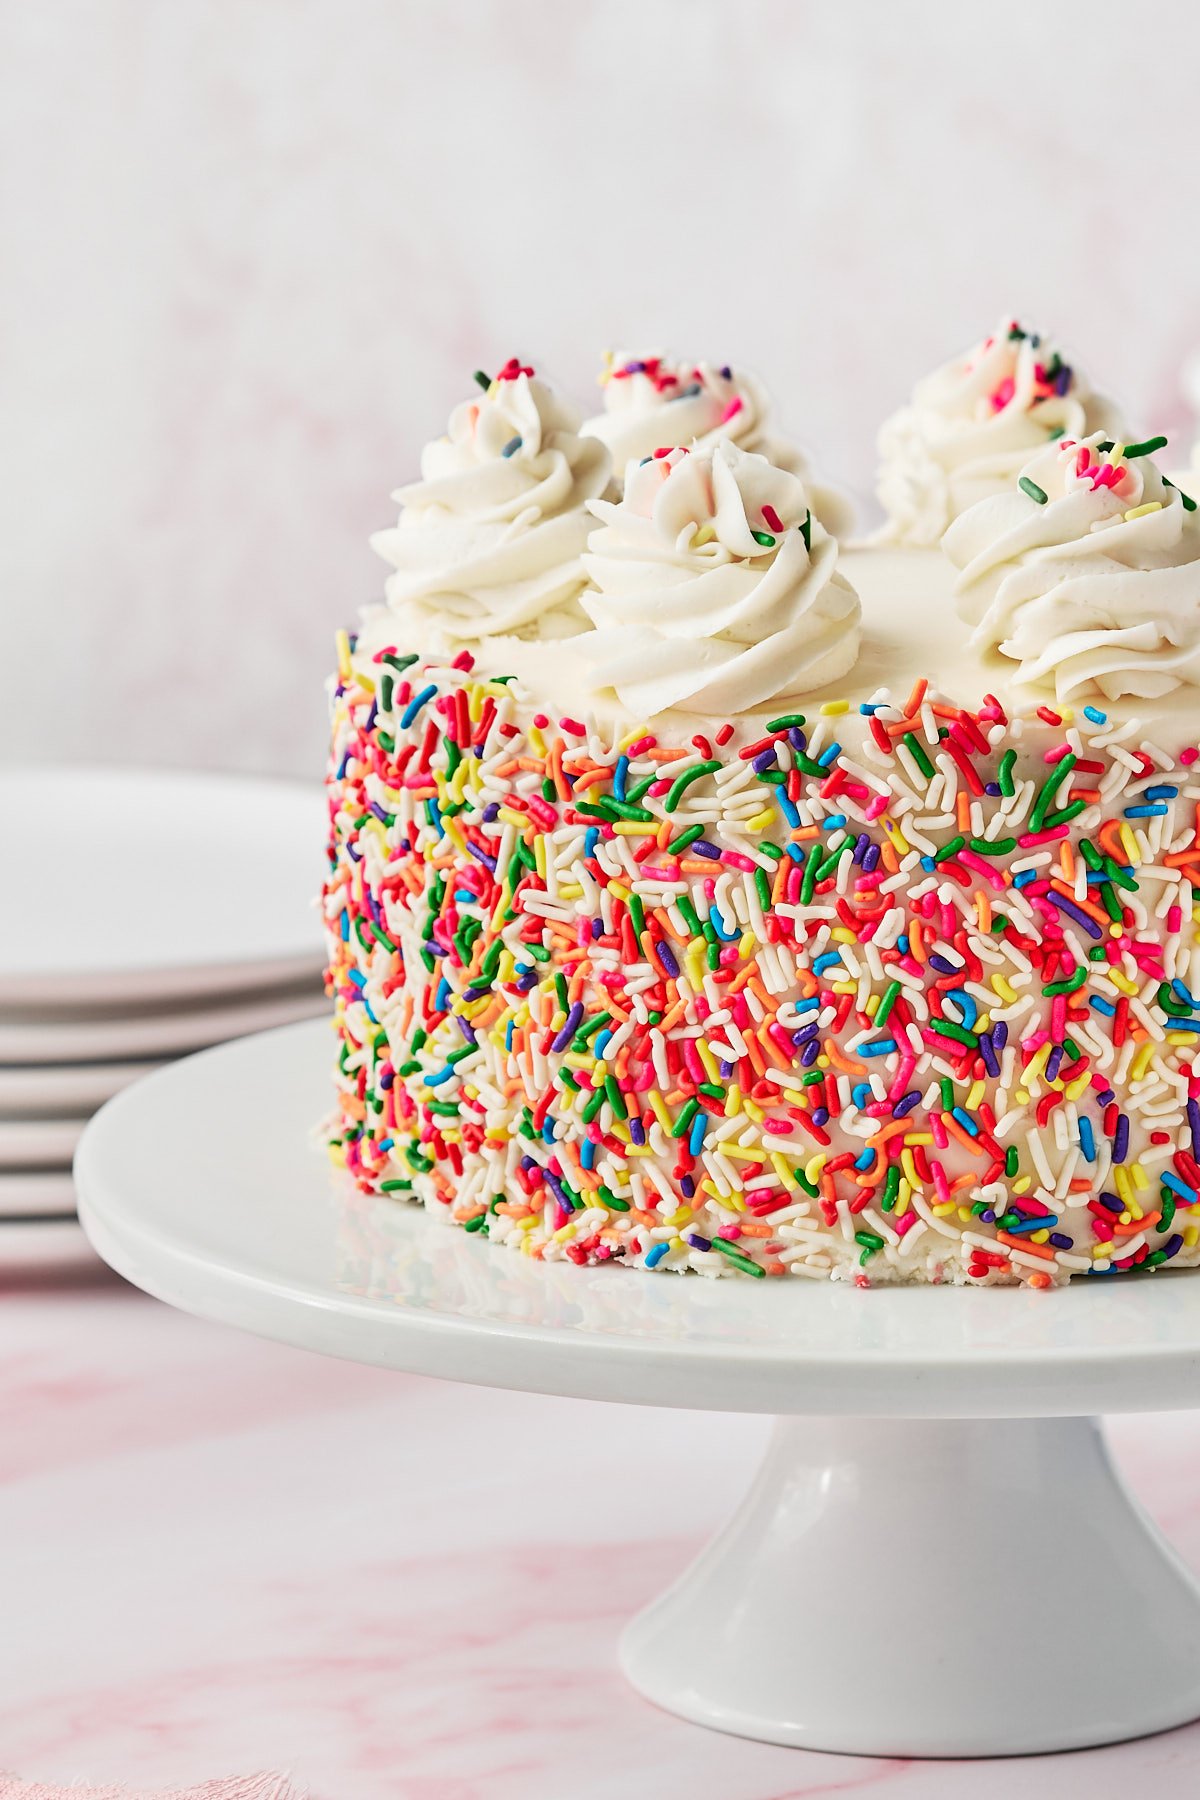
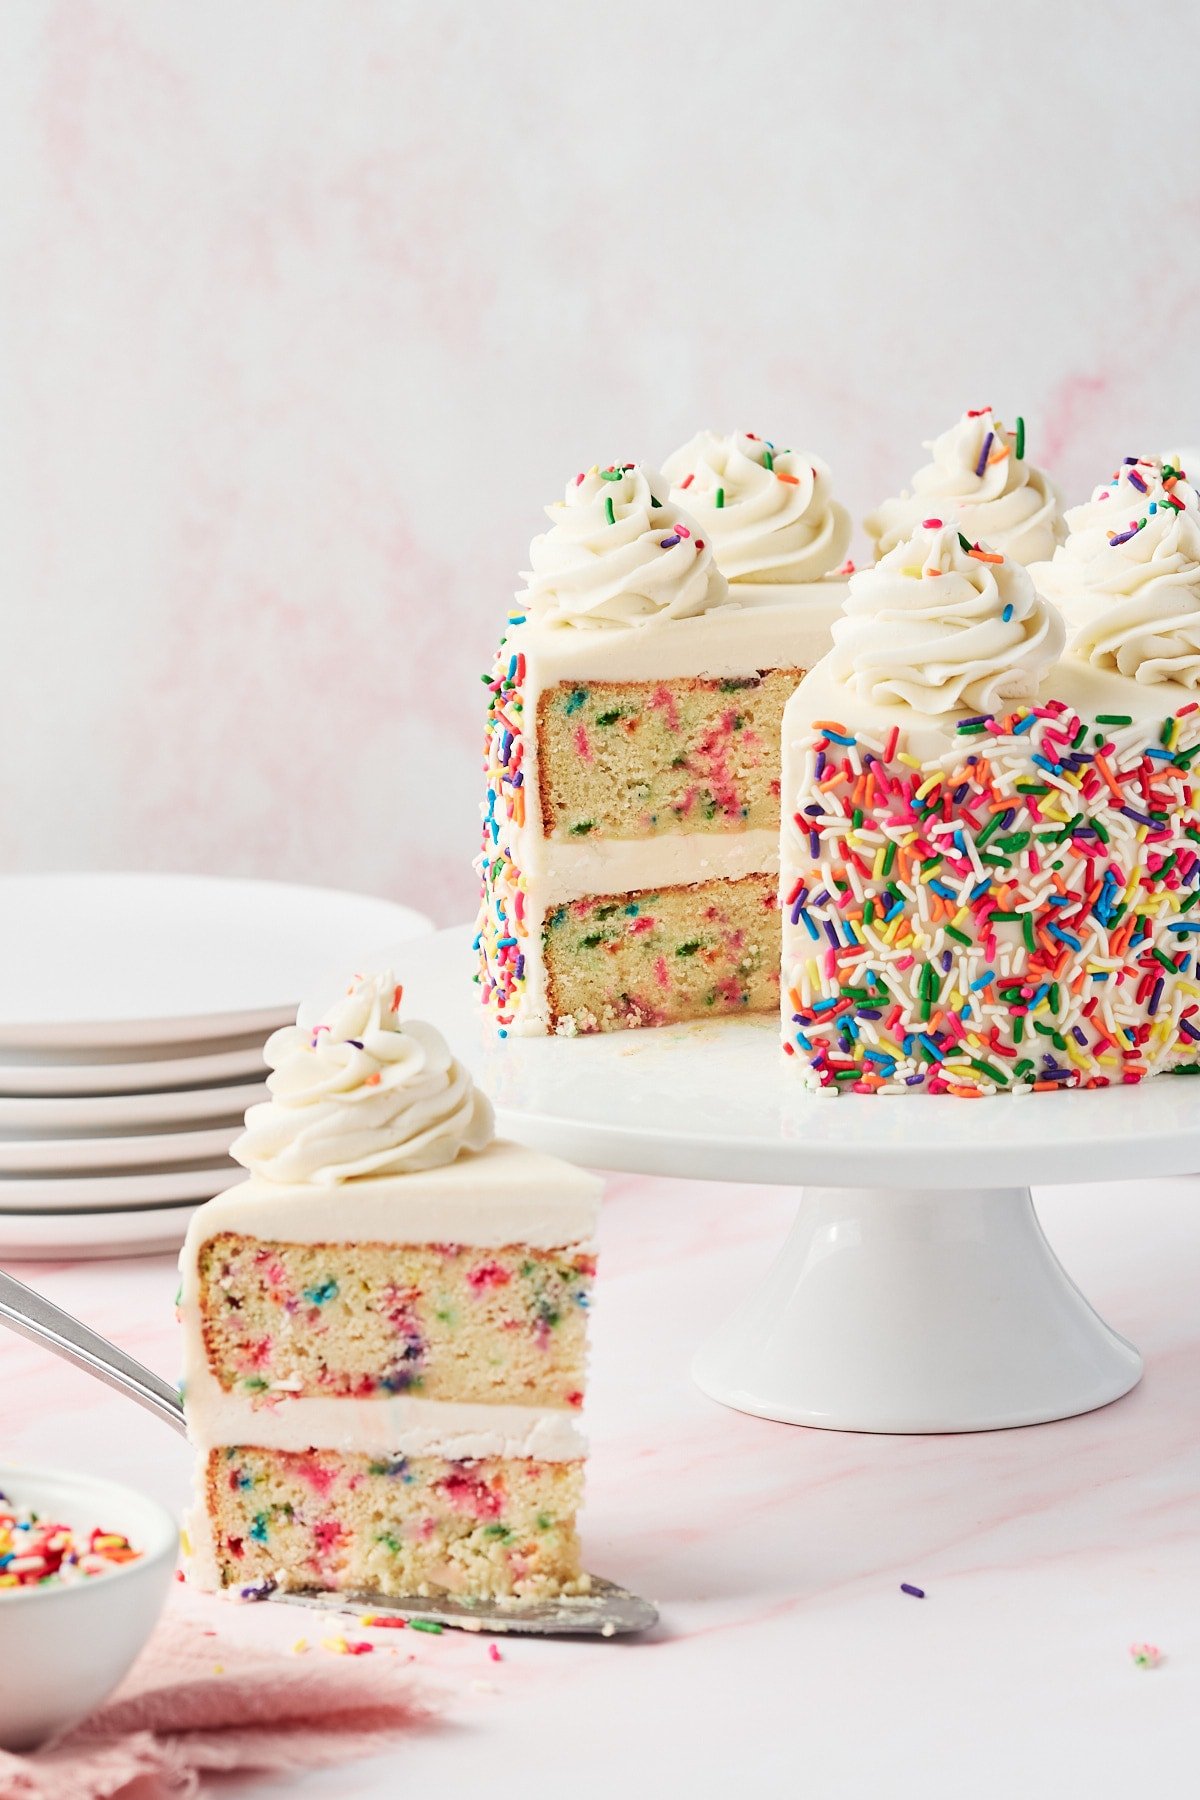
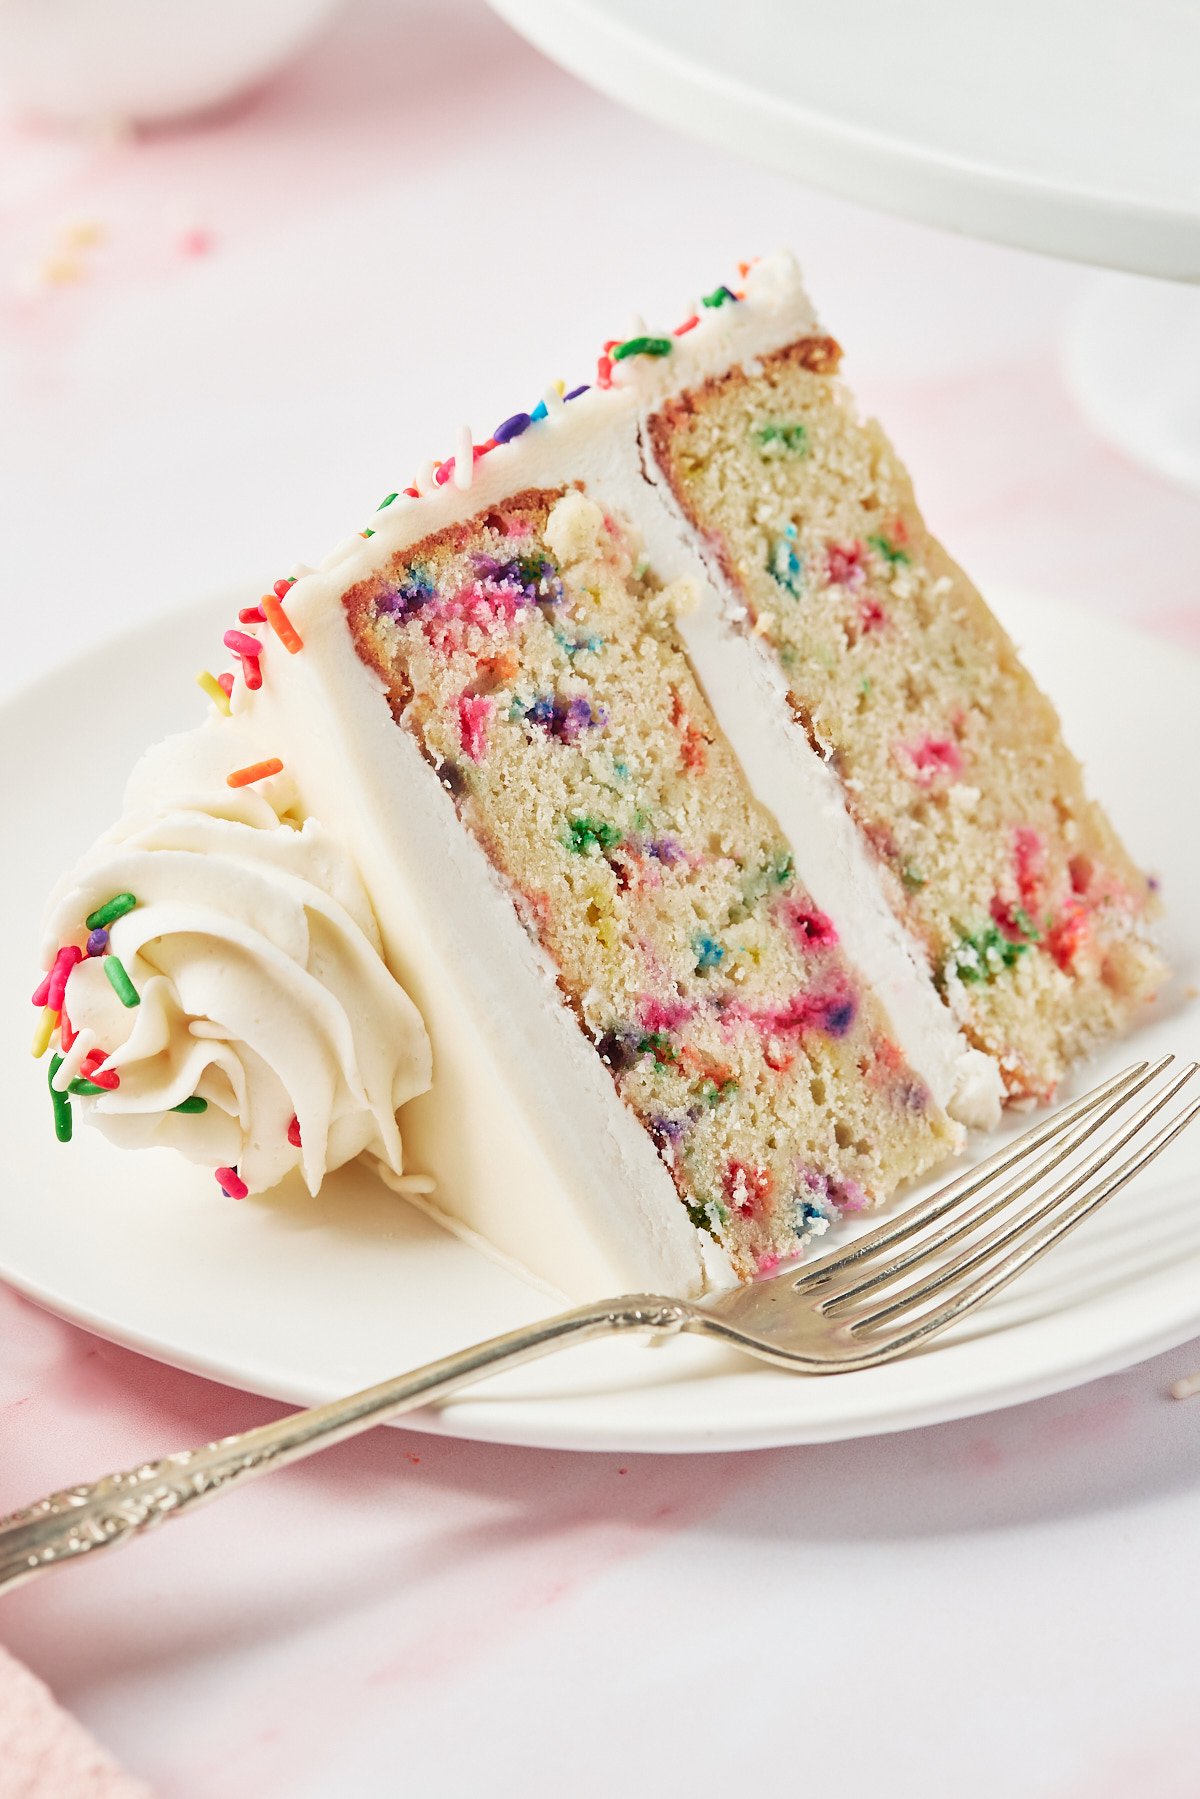
This gluten free birthday cake is a classic vanilla layer cake with rainbow sprinkles and fluffy buttercream, made for true birthday-style celebrating. It’s baked into sturdy yet tender cake layers that stack cleanly, frost smoothly, and slice without crumbling or falling apart. A well-balanced gluten-free flour blend paired with the right mixing method creates a moist, nostalgic crumb with no grit, so the finished cake tastes just as good to everyone at the table–not just those eating gluten free!

Why You’ll Love This Gluten Free Birthday Cake Recipe
Making my girls’ birthday cakes is one of my favorite traditions, and when my daughter asked for a simple, classic birthday cake that worked for our family, I wanted it to be perfect! This recipe delivers everything you expect from a traditional birthday cake–light texture, rich vanilla flavor, and a festive funfetti look–right up there with my cookie dough cake and brownie cookie cake, but without anyone guessing it’s gluten-free. If you’re baking for mixed dietary needs, my vegan vanilla cake is another great option!
It’s dependable enough for parties, sturdy enough for decorating, and simple enough that you don’t need advanced baking skills to get great results. I always frost it with my classic buttercream frosting because it pairs perfectly with the soft vanilla layers and finishes the cake beautifully! This is the gluten free birthday cake I come back to year after year whenever a birthday rolls around.
Ingredients You’ll Need
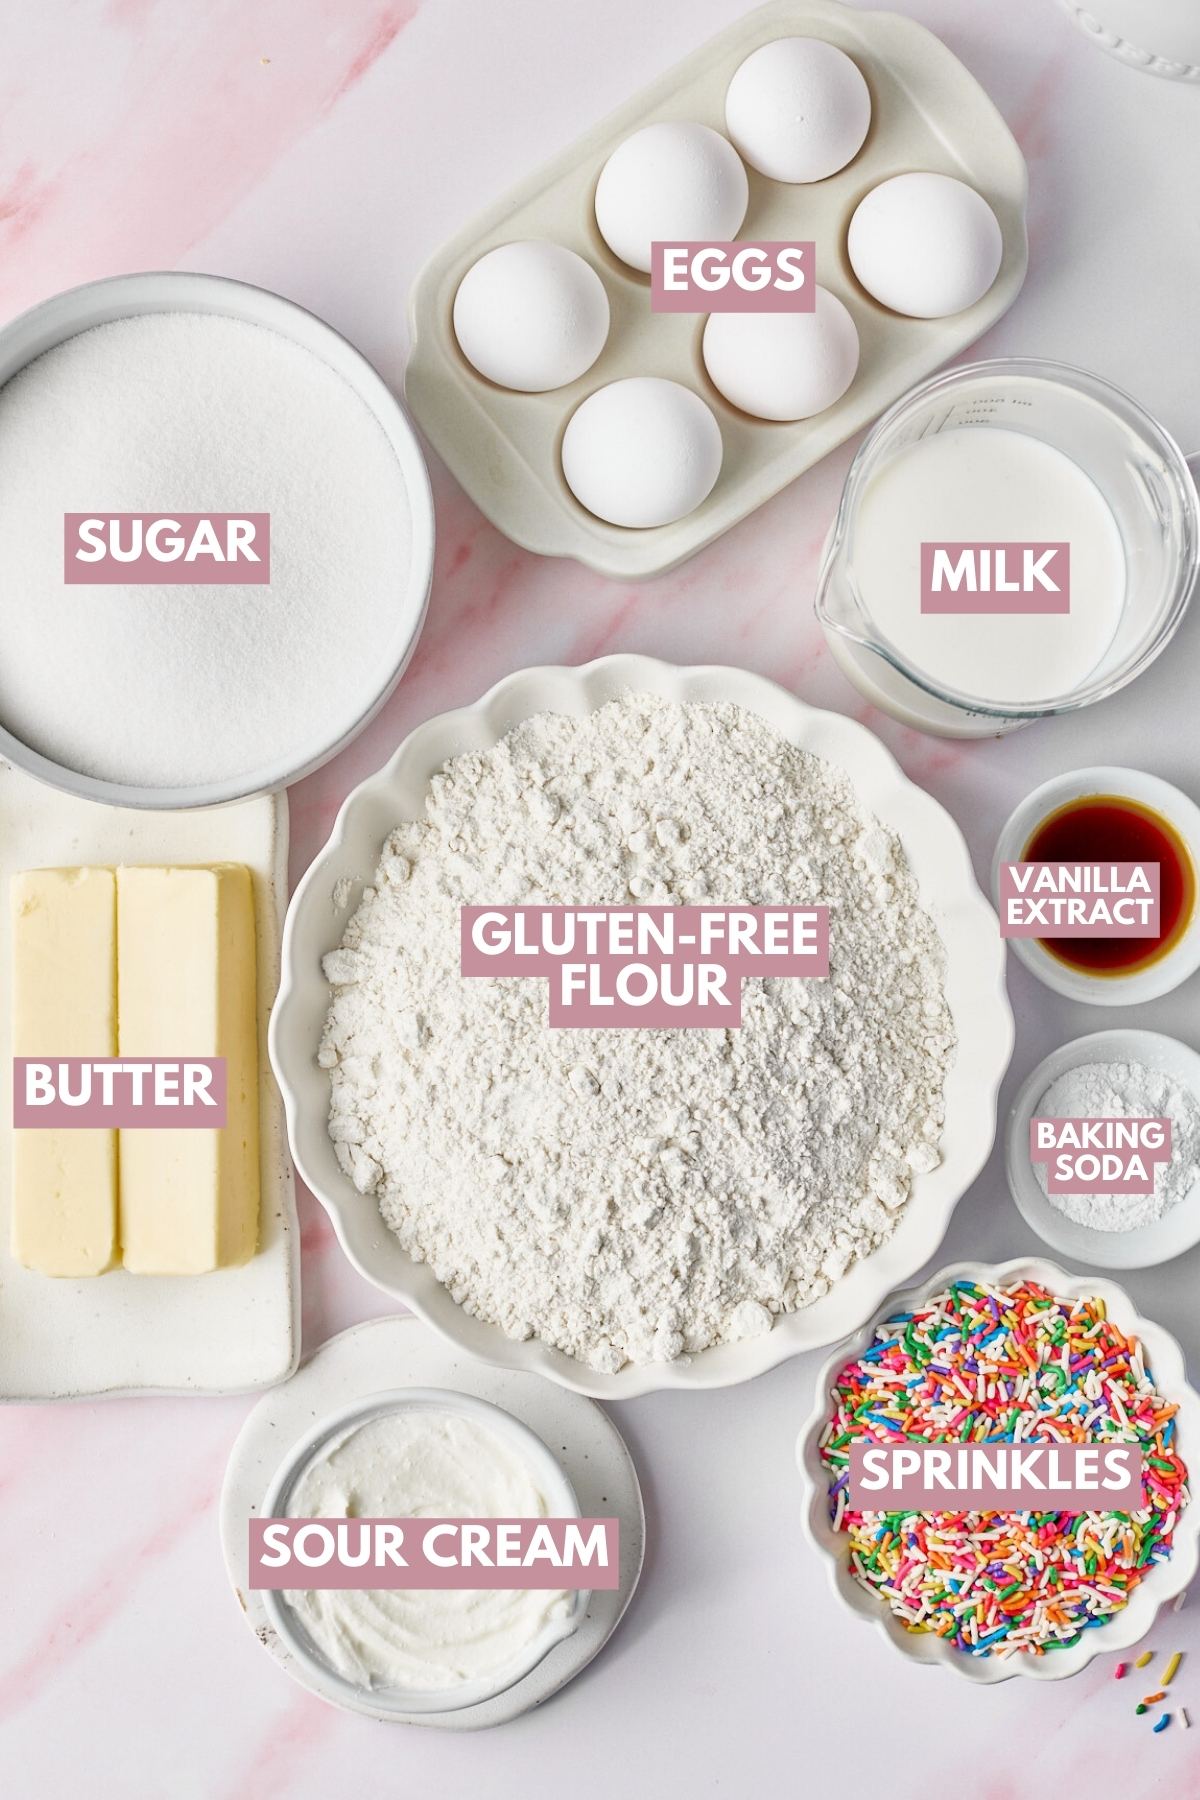
- Gluten-free all-purpose flour: A 1:1 gluten-free flour blend provides structure without grit. I use King Arthur Measure for Measure, which already contains xanthan gum. Bob’s Red Mill 1:1 also works. Almond flour or alternative blends will not work here.
- Granulated sugar: Sweetens the cake and helps create a tender, moist crumb.
- Unsalted butter: Adds richness and flavor while helping the cake stay soft. Make sure it’s fully softened so it creams properly.
- Large eggs: Provide structure and stability so the layers bake up sturdy enough to stack.
- Egg whites: Add extra lift and lightness, helping the cake stay fluffy instead of dense.
- Whole milk: Adds moisture and helps create a smooth, cohesive batter.
- Buttermilk: Adds tenderness and balances sweetness with a subtle tang. You can substitute by adding a splash of lemon juice to milk if needed.
- Sour cream: Keeps the cake extra moist without weighing it down.
- Gluten-free baking powder: The main leavening agent that helps the cake rise evenly.
- Vanilla extract: Gives the cake its classic birthday cake flavor.
- Rainbow sprinkles: Create the funfetti look. Use classic jimmies for best results. Nonpareils tend to bleed into the batter.
- Buttercream frosting: Adds a rich, creamy finish that complements the vanilla cake layers and makes the cake easy to decorate.
How to Make Gluten-Free Birthday Cake
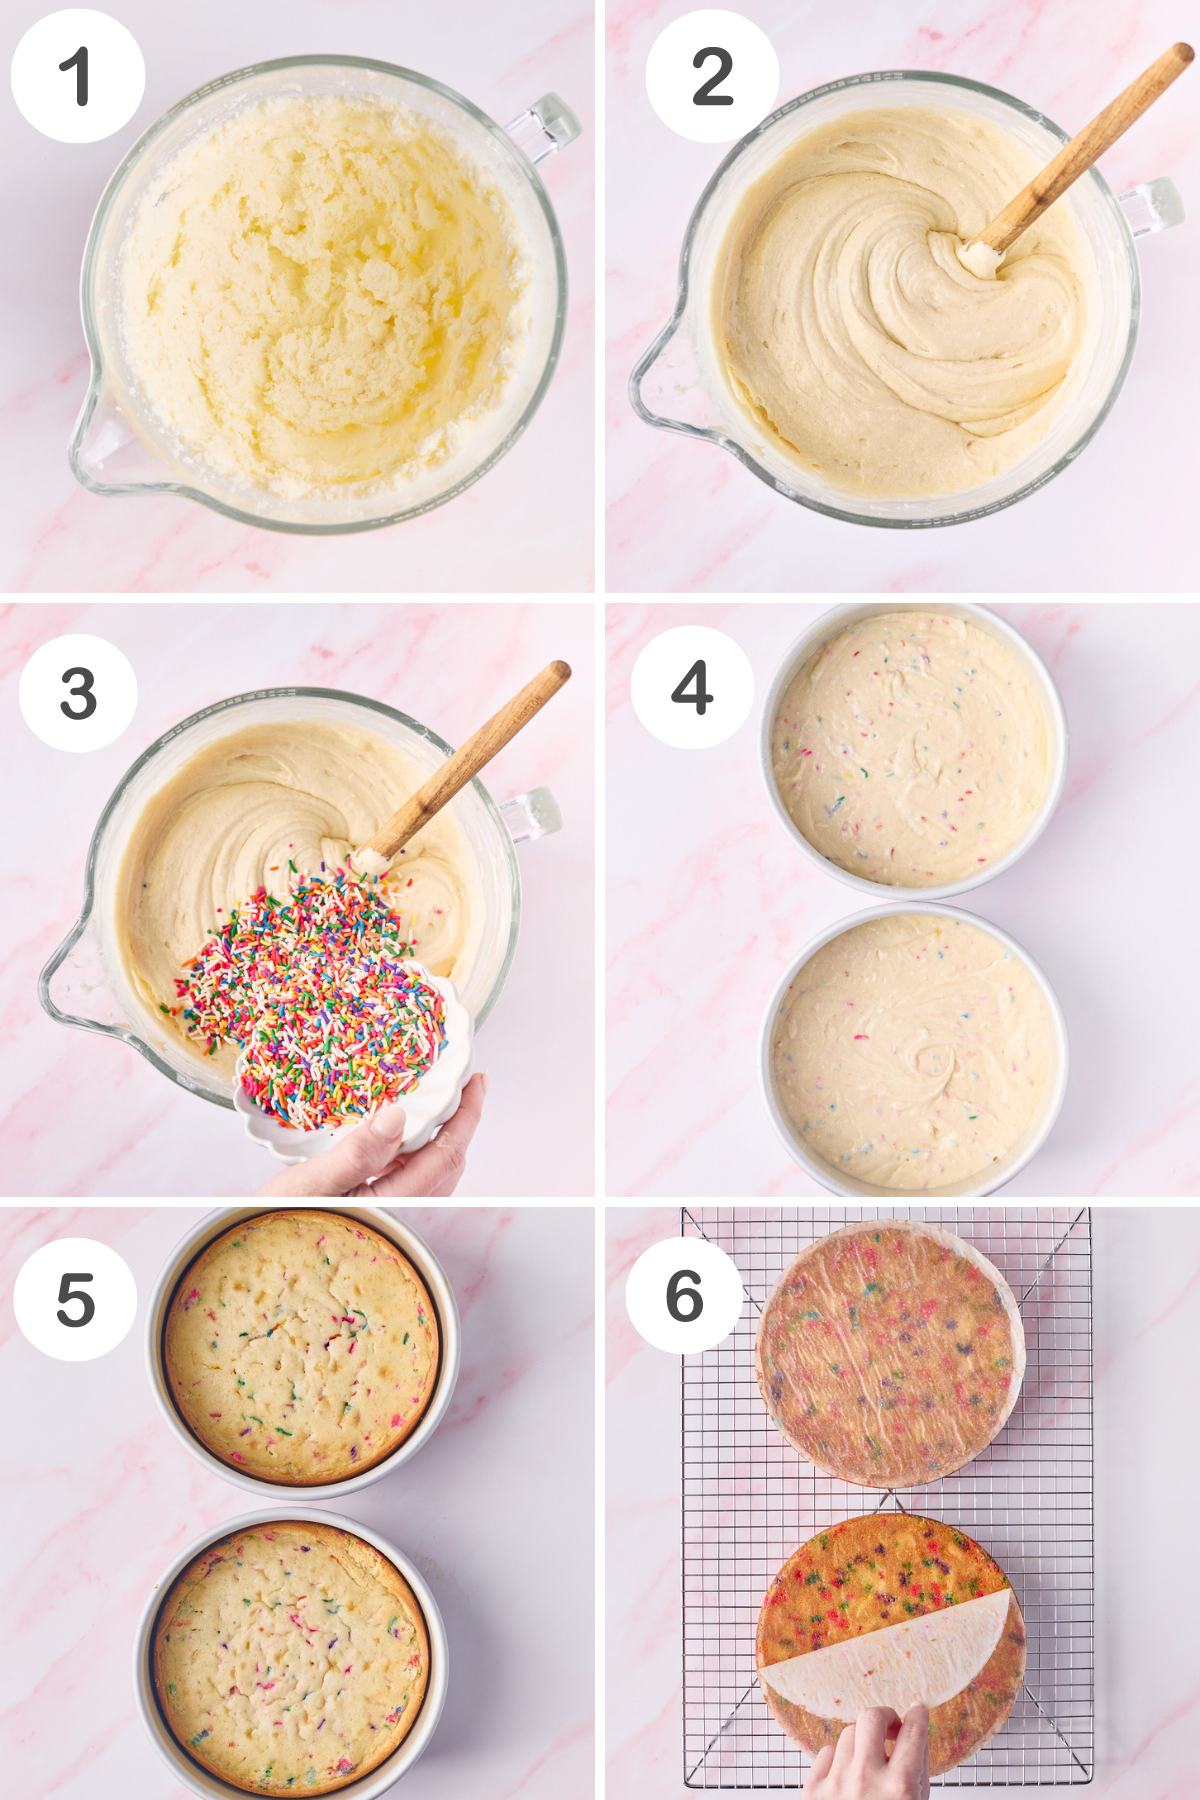
Step 1: Preheat the oven to 350°F and prepare your pans by greasing and lining with parchment. Sift together the gluten-free flour and baking powder.
Step 2: Cream butter and sugar until light and fluffy, then add eggs and egg whites one at a time. Mix in vanilla.
Step 3: Combine milk, buttermilk, and sour cream in a separate bowl.
Step 4: Add dry ingredients to the butter mixture in three additions, alternating with wet ingredients. Mix just until combined.
Step 5: Add dry ingredients to the butter mixture in three additions, alternating with wet ingredients. Mix just until combined.
Step 6: Gently fold in sprinkles.
Step 7: Divide batter evenly between prepared pans and smooth the tops.
Step 8: Bake until a toothpick inserted in the center comes out clean.
Step 9: Cool briefly, then transfer cakes to wire racks to cool completely. Assemble and frost once fully cooled and enjoy!
Mac’s Pro Tip
Pan Size Options
This gluten-free funfetti cake recipe works well for multiple pan sizes:
- Two 8-inch round pans: Fill each about two-thirds to three-quarters full
- Three 6-inch round pans: Fill about halfway
- Sheet cake: Use a standard sheet pan and adjust bake time, checking for doneness
Expert Tips for Success
- Use room-temperature ingredients so the batter mixes evenly and bakes up smooth. Measuring flour carefully matters too–a kitchen scale gives the most consistent results.
- Freeze the cake layers for easier decorating. Wrap fully cooled layers tightly and freeze for 6-24 hours. Frozen layers are easier to stack, create fewer crumbs, and often taste even better once thawed.
- Keep the funfetti theme going. If someone in your house loves celebrating with a sweet birthday breakfast, my birthday cake pancakes are a fun way to carry the celebration from morning to night!
- How to avoid cake sink: Overfilling pans is one of the most common causes. Level the batter gently, tap pans to release air bubbles, avoid opening the oven door too early, and always check for doneness before removing the cakes.
Storage & Make-Ahead Tips
- This cake is ideal for planning ahead. Bake and freeze the layers up to one month in advance, frost while frozen, then let the finished cake thaw at room temperature for 2-4 hours before serving.
- Once frosted, the cake can be stored at room temperature for up to 3 days if covered well. If refrigerated due to heat or humidity, allow it to come to room temperature slowly before serving to avoid condensation on the frosting.
Recipe FAQs
Yes! The cake layers can be baked in advance, wrapped tightly, and stored at room temperature or frozen until ready to frost, making it ideal for birthday prep.
A 1:1 gluten-free flour blend that already contains xanthan gum gives the best structure and texture without needing extra ingredients.
Yes! This recipe is designed to have the same soft crumb, vanilla flavor, and funfetti look as a classic birthday cake, with no gritty or dry texture.
More Gluten-Free Dessert Recipes

Follow on Instagram
If you love this gluten free birthday cake, please give it a star rating and leave a comment below! Follow me on Pinterest, Facebook, and Instagram for more!

Gluten-Free Funfetti Birthday Cake
Ingredients
- 3 cups gluten-free flour (360g) I use King Arthur's Measure for Measure
- 2 cups sugar (400g)
- 2 sticks butter (1 cup 227g)
- 4 large eggs
- 2 large egg whites
- 3/4 cup whole milk
- 1/4 cup buttermilk
- 1/3 cup sour cream
- 1 tbsp + 2 tsp gluten-free baking powder
- 3 tsp vanilla extract
- 3/4-1 cup sprinkles
Buttercream Frosting
- 1 cup unsalted butter 2 sticks
- 1/3 cup heavy whipping cream
- 4.5-5 cups confectioners sugar sifted
- 2 tsp clear vanilla extract
Instructions
Gluten-Free Cake
- Preheat the Oven:Preheat your oven to 350°F (175°C). Prepare (2) 8-inch or (3) 6-inch round cake pans by greasing them and lining the bottoms with parchment paper. Set aside.
- Sift the Dry Mix: In a separate bowl, sift together the gluten-free flour and baking powder. Set aside
- Cream Butter & Sugar: In a large mixing bowl, cream together the softened butter and sugar 3-5 minutes until light and fluffy using a hand mixer or stand mixer. Creaming the butter and sugar is a crucial step in getting the perfect texture. Add the eggs and egg whites one at a time, beating well after each addition. Stir in the vanilla extract.
- Mix the Milk and Sour Cream: In another bowl, combine the whole milk, buttermilk, and sour cream.
- Prepare the Batter: Add the dry ingredients to the butter mixture in three additions, alternating with the wet ingredients, starting and ending with the dry ingredients. Mix until just combined, being careful not to overmix. Gently fold in the sprinkles until evenly distributed throughout the batter.
- Add Batter To Pans: Divide the batter evenly among the prepared cake pans. Smooth the tops with a spatula to even out the batter.
- Filling Cake Pans Correctly: For an 8 or-9 inch round cake pan, you typically want to fill it no more than two-thirds to three-quarters full, depending on the recipe. When filling a 6-inch cake pan with batter, you typically want to fill it to about halfway
- Bake: Place the pans in the preheated oven and bake for 35-40 minutes, or until a toothpick inserted into the center of the cakes comes out clean.
- Cool: Remove the cakes from the oven and let them cool in the pans for 10 minutes. After 10 minutes, carefully remove the cakes from the pans and transfer them to wire racks to cool completely.
- Optional Step: Freeze the cake for easier decorating! You can skip right ahead to step 11, but if you want to use my trick for better taste and easier decorating, wrap your cooled cakes in plastic wrap and freeze for 6-24 hours. Once frozen, move on to the assembly. Then, cover your frosted cake and let it thaw at room temperature for 2-4 hours before serving. Don’t refrigerate or it can dry out.
- Assemble the Cake: Once the cakes are completely cooled, you can assemble the cake by layering them with your favorite frosting between each layer. Optionally, you can frost the top and sides of the cake with more frosting.
- Sprinkle by Hand: Place the cake over a baking sheet or large plate to catch any excess sprinkles. With clean hands, gently press the sprinkles onto the sides of the cake, rotating the cake as you go to ensure even coverage.
Buttercream Icing
- In a stand mixer, add the butter and beat together with the paddle attachment or use a hand mixer on medium speed until smooth and creamy. Add the vanilla extract to the butter and continue to beat until well combined.
- Gradually add the confectioners’ sugar to the butter, one cup at a time. Start the mixer on low speed to avoid a sugar shower. Scrape down the sides of the bowl as needed. Add the heavy cream slowly. Check the consistency of the buttercream. If it’s too thick, add a little more heavy cream, one tablespoon at a time, until you reach your desired consistency. If it’s too thin, add a bit more confectioners’ sugar. TIP: If you want bright white icing, add a very small touch of purple food coloring. This cancels out the yellow tint and makes it super white. If you want enough icing to decorate the top, I recommend doubling the buttercream recipe.
Notes
Pan Size Options
This gluten-free funfetti cake recipe works well for multiple pan sizes:- Two 8-inch round pans: Fill each about two-thirds to three-quarters full
- Three 6-inch round pans: Fill about halfway
- Sheet cake: Use a standard sheet pan and adjust bake time, checking for doneness.
Expert Tips for Success
- Use room-temperature ingredients so the batter mixes evenly and bakes up smooth. Measuring flour carefully matters too–a kitchen scale gives the most consistent results.
- Freeze the cake layers for easier decorating. Wrap fully cooled layers tightly and freeze for 6-24 hours. Frozen layers are easier to stack, create fewer crumbs, and often taste even better once thawed.
- Keep the funfetti theme going. If someone in your house loves celebrating with a sweet birthday breakfast, my birthday cake pancakes are a fun way to carry the celebration from morning to night!
- How to avoid cake sink: Overfilling pans is one of the most common causes. Level the batter gently, tap pans to release air bubbles, avoid opening the oven door too early, and always check for doneness before removing the cakes.
Storage & Make-Ahead Tips
- This cake is ideal for planning ahead. Bake and freeze the layers up to one month in advance, frost while frozen, then let the finished cake thaw at room temperature for 2-4 hours before serving.
- Once frosted, the cake can be stored at room temperature for up to 3 days if covered well. If refrigerated due to heat or humidity, allow it to come to room temperature slowly before serving to avoid condensation on the frosting.
Equipment


Nutrition
Nutrition information is automatically calculated, so should only be used as an approximation.


Hi Mac! my cakes are in the oven as I type! Best cake batter I’ve ever made so I’m very excited for a piece tomorrow! Question…How do I keep the butter from splitting when making butter cream frosting? Ive never been successful…I plan to make your frosting recipe tomorrow.
To keep buttercream from splitting, make sure all your ingredients, especially the butter and milk, are at room temperature before starting. Beat the butter until it is light and fluffy before slowly adding powdered sugar in small batches. If it starts to split or look curdled, gently warm the bowl using a warm towel, hair dryer, or double boiler for a few seconds, then continue beating until it comes back together. Stick-style butter or dairy-free alternatives provide the most stable results.
Looks delicious. However, I do have a question. My granddaughter is allergic to egg whites. Any suggestions on substitutions?
I have not tested a substitute. However, a simple option is unsweetened applesauce. Use ¼ cup applesauce for each egg white. This works well as a binder and keeps the cake moist, though it can make the cake slightly denser. If you decide to give it a try, let me know how it turns out.